Creeper World 4 Advanced Strategy Guide: Pressure, Terrain, and Packet Control
Advanced Creeper World 4 strategies for controlling Creeper pressure, building stronger packet networks, using terrain, placing weapons better, and pushing without collapsing.
Creeper World 4 gets brutal when “build more guns” stops working.
At a basic level, you can survive by expanding, powering the grid, holding the Creeper back, and slowly pushing forward. Advanced play is different. It is not about having the biggest line. It is about knowing where the pressure is going before it arrives.
The Creeper does not attack like a normal tower defense enemy. It pools, spills, climbs, floods, and punishes bad terrain reads. A copied build order will only carry you so far because the real enemy is not one lane. It is the shape of the map.
This guide is for players who already understand the core loop and want cleaner clears, harder challenge runs, faster objectives, and fewer ugly collapses. The focus is pressure control, packet flow, terrain use, weapon purpose, and knowing when to push instead of just shoving more towers into the mess.
Think in pressure systems, not build orders
The common advanced mistake is treating Creeper World 4 like a fixed-lane tower defense game. It is defense strategy, but the “lanes” are fluid. Terrain, emitter volume, elevation, and your own expansion path create the channels.
That means a copied build order is fragile. A strong plan starts by asking:
- Where will Creeper naturally pool?
- Which ridges create safe firing shelves?
- Which valleys become pressure funnels?
- Where will packet delivery slow down if the front moves too far out?
- Which enemy behavior can disrupt a stable hold?
- Where will a Nullifier push expose the network?
Your first goal is not to cover every tile. It is to identify the places where a small defensive investment changes the whole map. In advanced tower defense terms, you are buying control, not just damage.
Bad players build more weapons because the Creeper is scary.
Better players ask where the Creeper is actually going.
The advanced rule: every front has a bottleneck
When a Creeper World 4 front starts failing, the answer is not always more weapons.
Sometimes the bottleneck is energy.
Sometimes it is packet travel time.
Sometimes it is terrain.
Sometimes it is missing mortar coverage.
Sometimes it is a sniper, missile, or shield problem.
Sometimes the front is simply too wide.
Bad players panic-build. Advanced players diagnose.
Before adding anything, ask what is actually failing. Are cannons running dry? Are mortars hitting the wrong depth? Are packets crawling across half the map? Is Creeper pooling below your weapons? Are Eggs, Air Sacs, or other disruptive threats forcing repairs at the worst possible moment?
The faster you name the bottleneck, the less junk you build.
Build the economy before the front demands it
Advanced players often lose momentum because they overbuild weapons before the network can feed them. A cannon with no packets is not a defense. A mortar that fires once and then starves is not map control. It is a packet sink with a barrel attached.
The real defensive resource is not only energy. It is reliable delivery under pressure.
Before committing to a larger front, check three things:
- Can your network support continuous firing?
- Are construction packets competing with ammo packets at the worst possible moment?
- Do you have enough stored energy to recover after a surge?
Stored energy can save a push, but it does not fix a bad economy. If your front only holds because the Rift Lab is bleeding through reserves, the defense is already lying to you.
Use reserves as a timing tool. Stored energy can help you survive a push, finish a critical structure, or hold during a temporary deficit. It does not mean your grid is healthy.
A practical rule: if weapons, towers, and forward construction all need packets at the same time, you are already late. Pause the outward push, stabilize the grid, then advance again.
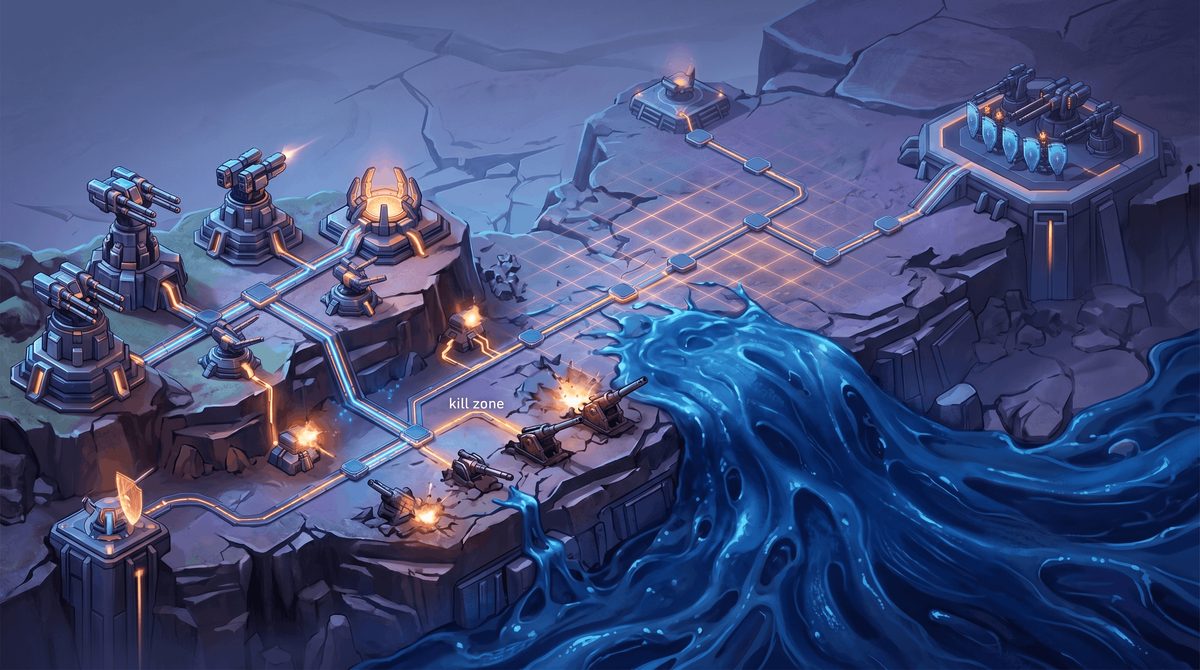
Use valleys as kill zones, not graveyards
Strategic turret placement in valleys can be powerful, but only if you understand what the valley is doing. Valleys concentrate fluid pressure. That makes them dangerous, but it also makes them predictable.
The best valley defense usually avoids placing everything on the lowest ground. Low positions can be overwhelmed quickly if Creeper depth rises faster than your weapons can clear it.
Instead, think in layers:
- Hold the lip of the valley with consistent cannon fire.
- Place mortars where Creeper naturally thickens.
- Use the valley mouth as a compression point.
- Keep packet routes out of the flood path when possible.
- Build fallback coverage on nearby elevation.
- Use shields or terrain work only when they change the pressure shape.
The goal is not to cover the valley floor perfectly. The goal is to turn the valley into a controlled drain where the Creeper spends time under fire before it threatens your infrastructure.
This is one of the most important tower placement tips for advanced play: place for the shape of the fluid, not the shape of your base.
A neat line of weapons can be worse than a staggered set of overlapping angles if the Creeper is arriving unevenly.
Separate shallow control from deep Creeper control
Not every weapon is solving the same problem. Advanced defense improves when you stop asking one layer to do every job.
Shallow Creeper control is about keeping thin spread from reclaiming ground. It rewards consistent cannon coverage, quick response, and good positioning near the active edge.
Deep Creeper control is different. When Creeper is pooling, surging, or pouring through a basin, you need weapons that punish density and buy time for the rest of the line. That usually means mortars, better terrain use, Anti-Creeper support, or a cleaner compression point.
If you respond to deep pressure with only shallow-control tools, the front looks stable until it suddenly is not.
A clean defensive line usually has:
- Cannons for thin spread and edge control.
- Mortars for pools, basins, and dense pressure.
- Snipers, missiles, or shields for disruptive threats.
- A packet route that does not collapse when everything fires.
- Enough terrain control to keep the Creeper moving where your weapons matter.
This layered approach is where Creeper World 4 becomes less about raw tower count and more about tower purpose.
More weapons are not always better.
More correctly assigned weapons are.
Stop treating snipers like optional decoration
Players often underestimate snipers because snipers do not visibly drain the map.
That is not their job.
Snipers are there to stop the stupid little disaster that ruins a clean front: payloads, Eggs, Air Sac pressure, and threats that force repairs at the worst possible moment.
A stable front in Creeper World 4 can fail because one specialist threat creates a packet crisis, disables part of the line, or opens a timing window for the Creeper to surge. Sniper coverage reduces that risk. ERN-supported or well-positioned snipers can protect the structure of the defense rather than its surface.
This matters most when your front is far from the core network. The farther your packets travel, the more expensive any disruption becomes. A lost forward unit is not just a replacement cost. It can expose towers, break coverage, and force your economy into emergency repair mode.
Snipers are a defensive insurance layer. They do not replace cannons, mortars, missiles, or shields. They also feel wasteful if you build them too early.
But once the map starts throwing disruptive behavior at a stretched front, sniper coverage can be the difference between a controlled push and a messy reset.
Advance in pulses, not in a constant crawl
A constant forward crawl feels productive, but it often creates the worst kind of front: too wide, too hungry, and too far from support.
Advanced play benefits from pulse expansion. Build to a strong position, stabilize, then push again. Each pulse should leave behind a front that can hold without constant panic.
A good expansion pulse looks like this:
- Secure packet delivery to the staging area.
- Build enough firepower to hold the next terrain feature.
- Let the line clear and settle.
- Add snipers, missiles, shields, or Anti-Creeper if the mission demands it.
- Move the attack forward only when the old front is no longer fragile.
This pacing is especially useful for secondary objectives. Rushing blindly can look faster for the first few minutes, but every collapse costs time. A slightly slower push that never breaks often finishes cleaner.
The key is to distinguish speed from impatience.
Speed is building only what you need and moving with purpose.
Impatience is extending the front before the network can support it.
Treat terrain modification as defense, not decoration
Terrain work is one of the clearest separators between competent and advanced Creeper World 4 play.
You are not just making the map look cleaner. You are changing how pressure moves.
Use Terps and terrain changes to create:
- Firing shelves.
- Spillways.
- Dams.
- Safe packet corridors.
- Forward staging platforms.
- Delays that buy time for weapons to work.
- Cleaner Nullifier positions near major threats.
The main friction is cost and timing. Terrain work competes with other demands, and overdoing it can delay the weapons that actually hold the line.
The trick is to modify only the terrain that changes the defensive equation.
Do not flatten everything.
Flat maps can remove natural chokepoints and make the Creeper spread wider. Often, the smarter play is to preserve terrain that channels pressure while improving just enough space for weapon placement, network links, and forward staging.
Think of terrain as a trap system. You are guiding the Creeper into shapes your defense can punish.
Keep the network narrow where pressure is high
A sprawling network is easy to build and hard to defend. In advanced runs, network shape matters almost as much as weapon placement.
Wide grids create more exposed structures, more repair demand, and more ways for packet flow to become inefficient. A narrow, redundant backbone is usually stronger than a broad web of fragile connections.
Prioritize:
- Short supply routes to active fronts.
- Protected links through stable terrain.
- Redundant paths near important positions.
- Forward towers only when they serve a clear purpose.
- Retreat space if the line is likely to flex.
- Clean routes to the weapons that cannot afford to starve.
This matters most when pushing across broken terrain or toward heavily defended areas. If one exposed connection can starve half the front, your defense is brittle.
If the front can lose a small section and still receive packets, you can absorb mistakes.
The best network is not the largest one. It is the one that keeps critical weapons fed when the map is at its worst.
Use Anti-Creeper with a plan
Anti-Creeper is strongest when it supports a specific defensive purpose. If you spread it casually, it may help, but it rarely changes the outcome of a difficult front.
Use it to:
- Reinforce a chokepoint.
- Slow pressure in a valley.
- Support a forward push.
- Hold reclaimed ground while construction catches up.
- Create a buffer before attacking a major source.
- Stabilize a position while a Nullifier finishes.
The mistake is treating Anti-Creeper like a universal solution. It still needs positioning, supply, and timing.
Dumping it into a wide, uncontrolled field can waste its value. Channeling it into a contested basin or along a planned front can turn it into real map control.
For advanced play, ask where Anti-Creeper will stay relevant the longest.
A short burst that buys the final seconds for a key structure can be worth it.
A large amount sent into a bad position may accomplish almost nothing.
Do not attack major sources until the front can survive the attempt
Pushing toward emitters, enemy structures, or Nullifier targets is where many strong runs become sloppy.
The front looks stable, so the player commits to the attack. Then construction packets, ammo packets, and defensive repairs all spike at once.
Before attacking a major source, confirm:
- The current line can hold without constant new construction.
- Your packet network is not already saturated.
- Snipers, missiles, shields, or other specialist answers are ready.
- You have a fallback if the push stalls.
- The attack path does not expose the whole grid.
- The Nullifier position can be supplied long enough to finish the job.
This is the difference between a surgical strike and a desperate shove.
In Creeper World 4, a failed forward attack can create more pressure than doing nothing. It consumes resources, extends supply lines, and may open a route for Creeper to retake ground.
A clean attack should feel almost boring at the moment it begins.
The hard work happened before the push.
Build fallback positions before you need them
Advanced defense is not about never losing ground.
It is about losing ground without losing the run.
Fallback positions are especially useful on maps where pressure changes quickly. A fallback can be as simple as a second line of weapons on higher terrain, a protected network route, or a prepared platform that can be armed quickly.
The point is to avoid emergency construction under full pressure.
Emergency builds are expensive because they happen when the network is already stressed. If you prepare the skeleton of a fallback early, you can respond faster and cheaper.
Good fallback planning also makes you more aggressive. When you know the front can bend without snapping, you can take smarter risks on secondary objectives.
The goal is not cowardice.
The goal is not pretending your first line will hold forever like some heroic idiot.
The goal is controlled failure.
Read collapse risk before the collapse
Most failed advanced runs show warning signs before the actual break.
The front does not suddenly fail. It starts asking for more than the network can provide.
Watch for:
- Weapons firing inconsistently.
- Construction slowing near the front.
- Creeper depth increasing despite stable tower count.
- Packets traveling long distances to solve small problems.
- Snipers, missiles, or shields constantly being needed in emergency mode.
- A growing need to manually intervene everywhere at once.
- Nullifier pushes stalling because the front is still hungry.
When you see these signs, do not add random weapons.
First identify the bottleneck.
Is the problem damage type, packet supply, terrain shape, network distance, or threat coverage?
Adding weapons to a supply problem makes the supply problem worse.
Adding network links to a terrain problem may not help.
Adding shallow control to deep pressure only delays the failure.
Advanced Creeper World 4 strategies depend on diagnosis. The faster you name the real problem, the less you have to rebuild.
Problem to fix table
| Problem | Likely cause | Better response |
|---|---|---|
| Cannons fire inconsistently | Packet starvation | Stabilize energy and shorten delivery routes |
| Creeper pools under the line | Not enough depth damage | Add mortars or reshape the pressure point |
| Front keeps breaking after expansion | Push is too wide or too early | Advance in pulses and stabilize each stage |
| Nullifier push stalls | Attack started before the line was ready | Secure the route before committing |
| Repairs keep stealing packets | Exposed network or specialist threats | Add protection, redundancy, snipers, missiles, or shields |
| Anti-Creeper disappears without impact | Bad placement or timing | Use it at chokepoints, basins, or active pushes |
| Terrain work slows the whole run | Overbuilding the map | Modify only terrain that changes the fight |
| You need constant manual fixes | No real defensive structure | Rebuild around bottlenecks instead of panic patches |
Adjust for secondary objectives and challenge play
Secondary objectives change what “good defense” means.
A safe full-map clear may be too slow. A fast route may be too fragile. A challenge setup may deny the comfortable buildup you normally rely on.
For speed-focused goals, cut anything that does not create forward momentum or protect the route. You still need stability, but not perfection. The common mistake is over-fortifying areas that will never matter again.
For survival-heavy challenges, do the opposite. Delay greed. Build the line that survives the worst wave, not the line that looks efficient in calm moments.
For objective-focused maps, plan backward. Identify the final pressure point, then build the network and terrain plan that gets you there with the least waste.
If an area does not support that route, do not sink resources into making it beautiful.
This is where advanced players gain the most time.
Not by clicking faster.
By refusing to defend irrelevant ground.
A practical advanced checklist
Before the next serious attempt, run through this checklist:
- Have I identified the real pressure lanes created by terrain?
- Is my packet network strong enough before the next expansion?
- Am I using stored energy as timing support instead of hiding a bad economy?
- Are valleys being used as kill zones instead of accidental flood traps?
- Do I have separate answers for shallow spread, deep pools, and disruption?
- Are snipers, missiles, or shields protecting the line where disruption would be costly?
- Is terrain work changing the defense, or just consuming time?
- Can the front survive while I attack the next major objective?
- Can the Nullifier position stay supplied long enough to finish?
- Is there a fallback if the push fails?
- Am I defending ground that actually matters to the objective?
If you want to master Creeper World 4, focus less on having the biggest line and more on having the right line.
The strongest defenses are compact, supplied, layered, and built around the way the Creeper actually moves.
Advanced Creeper World 4 is not tower spam.
It is pressure control.